Making an email client plugin for N1
This plugin works with N1 an open source email client made by Nylas. At the time of writing this, Nylas is going to phase out the current version of N1 and switch to a paid version. This plugin might not work for much longer, but learning React was a fun experience that I think is worthwhile to document.
The complete code can be found on github.
When I was at Technical Machine, one of the most rewarding yet tedious tasks was sourcing electric components for our boards. Rewarding because any work had an immediate effect – 10 cents saved on one part can easily add up to thousands of dollars. Tedious and boring because the work was route enough that it didn’t require too much thought, but juuuuust complicated enough to require actual work. It’s like an uncanny valley of thinking.
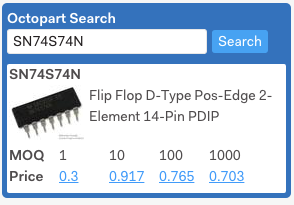
One thing that would have helped me out was an easy way to look up the part numbers that were always circulating around in my email. I was playing around with N1, and realized I could do just that, so I did:

Yeah it’s weird that the price at 1 unit is lower than 10. It could just mean that the supplier only had <10 units.
The plugin is simple. It plugs into the Octopart api and pulls for matching part numbers & the pricing associated with it at 1, 10, 100, and 1k units.
This was also my first time using React.
Setup
N1 has some great documentation and sample code that I used as a starting point. N1 has some default code that it gives developers by going to “Develop -> Create a plugin”, but it differentiated from the sample code, so I went with what was in the sample code instead.
Custom made packages are all in ~/.nylas/dev/packages.
The basic format of a plugin looks like:1
2
3
4
5
6
7
8/assets
/lib
main.es6
display.jsx
store.es6
/stylesheets
main.less
package.json
Hooking it up
main.es6 registers the custom react component and tells N1 where to render the plugin.
There’s a great tool under “Developer -> Toggle component regions” that shows the names of different regions. As far as I can tell, the regions are separated into “locations” and “roles”. The example sample code adds a component inside of an existing N1 component (the contact card), so it is located in a role. My octopart plugin is a new component, so it’s just placed in a location.
1 | export function activate() { |
Calling Octopart
The bulk of the code in the “datastore” of the react component consisted of an API call to Octopart and parsing the results.
Octopart’s API returns the image, description, and a series of bids from multiple suppliers of part prices at varying quantities, usually with prices logrithmically dropping to quantity purchased. My plugin just finds the cheapest bid at each quantity interval that I care about.
This data is returned as a json obj in the form of:
1 | that._part = {description: description, |
This contains all the information needed to render the plugin’s results.
Rendering
The UI components are an input box and a button.
1 | render() { |
The part that threw me off the most was having text appear in the input box as the user typed it. Because data is only rendered by value={this.state.searchText}, any text entered into the input box must be passed back into the react element and then re-rendered.
So basically text got entered into the input box which had an event: onChange={this._handleChange}.
And the _handleChange function reset what this.state.searchText was equal to:
1 | _handleChange = (event) => { |
The submit button called a _handleSubmit function that called the Octopart store:
1 | _handleSubmit = (event) => { |
And then the OctopartStore triggered a re-render to return back the results of the Octopart search.
Overall
Plugin-wise, a more useful integration would be to hook up the Octopart BoM (Bill of Materials) API. Parts for the BoM are usually decided over email, so it would be a really quick and easy workflow to integrate in part ordering. I also had to email BoMs back and forth between CMs (contract manufacturers), so having something always up to date that is linked to the version that the CM has would be a nice safety check.
React was much easier to pick up compared to the only other front-end JS framework I’ve used – Angular 1.0 (back in like 2012). Angular had so many specialized html hookups, so on top of learning a new framework, I also had to relearn the existing html framework I already knew. Angular was always kind of magical in how data flowed from the view back to the controller and so forth. As long as it was hooked up correctly, it would “just work”, but finding the magic key words for a proper hookup took a lot of googling.
React’s flow is much more obvious (like having to call .setState for instance). I didn’t read much of the official React docs, but was able to basically get something working by following method calls.
Full code is on github.
